Deploy Wazuh SIEM at Enterprise Level: Multi-Node Architecture on Ubuntu
2026-06-15 · Neetrox
If you’re running a SOC for multiple clients or managing security across a growing infrastructure, a single-node Wazuh setup won’t cut it. You need separation of concerns, better performance, and the ability to scale each component independently.
In this guide, I’ll walk you through deploying Wazuh 4.14 in a multi-node architecture — splitting the Indexer, Manager (with Filebeat), and Dashboard across three dedicated Ubuntu servers. This is the same setup I use to monitor 850+ agents across two companies simultaneously.
Let’s get into it.
Why Go Multi-Node?
A single-node deployment bundles everything on one machine. That’s fine for a homelab, but in production you’ll hit bottlenecks fast, especially on the indexer side when log volume spikes. Splitting components across nodes gives you:
Independent scaling — throw more storage at the indexer without touching the manager
Better fault isolation — a dashboard crash doesn’t take down alert processing
Improved performance — each component gets dedicated CPU and memory
Architecture Overview
Here’s the architecture we’re building. The Wazuh Manager receives logs from all agents and syslog sources, Filebeat forwards them to the Indexer for storage, and the Dashboard provides the web interface for analysis.
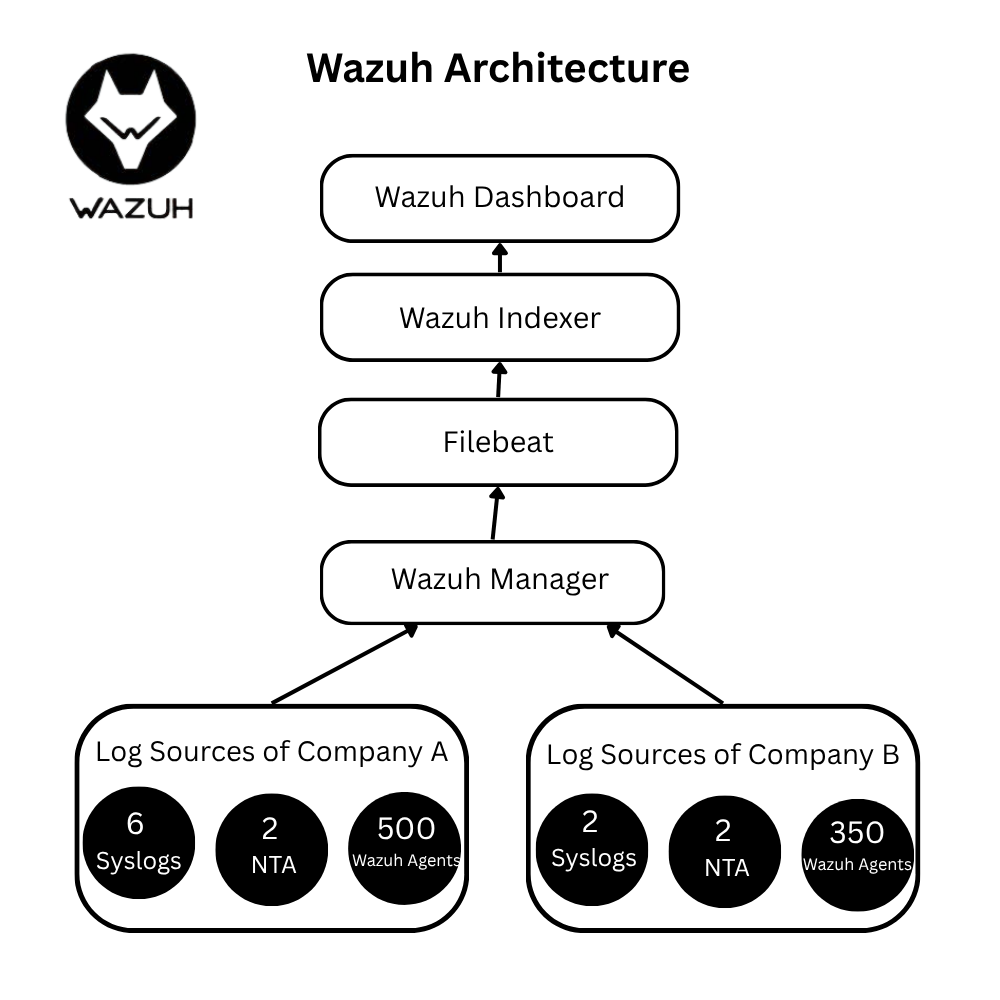
In my setup, I’m monitoring two companies: Company A with 6 syslog sources, 2 NTA feeds, and 500 Wazuh agents, and Company B with 2 syslog sources, 2 NTA feeds, and 350 agents. The multi-node architecture handles this comfortably.
Hardware Requirements
Here’s a balanced approach — reliable but cost-effective:
Server 1 — Wazuh Manager + Filebeat Processes alerts from all your devices.
OS: Ubuntu (latest LTS)
CPU: 8 cores
RAM: 16 GB
Storage: 100 GB
Server 2 — Wazuh Indexer Stores all security logs and data.
OS: Ubuntu (latest LTS)
CPU: 8 cores
RAM: 16 GB
Storage: 500 GB
Server 3 — Wazuh Dashboard Web interface where you view everything.
OS: Ubuntu (latest LTS)
CPU: 4 cores
RAM: 8 GB
Storage: 50 GB
Pro tip: The indexer is the most storage-hungry component. Size it according to your log retention policy — 500 GB is a good starting point for ~90 days of retention with 850 agents.
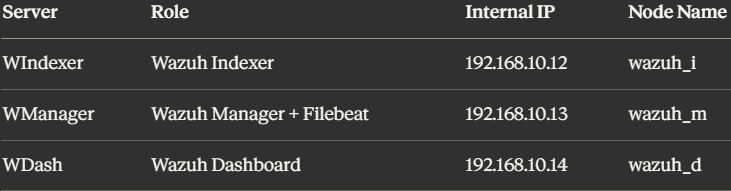
Prepare the Infrastructure
Spin up your three servers and assign static internal IPs. Here’s the mapping I’ll use throughout this guide:
Make sure all three servers can communicate with each other over the internal network before proceeding.
Step 1: Install the Wazuh Indexer
Everything starts with the indexer. We’ll generate the SSL certificates here and distribute them to all other nodes.
1.1 — Download the Certificate Tool and Config
SSH into your Indexer server (192.168.10.12) and download the certificate generation tools:
curl -sO https://packages.wazuh.com/4.14/wazuh-certs-tool.sh
curl -sO https://packages.wazuh.com/4.14/config.yml
1.2 — Edit config.yml
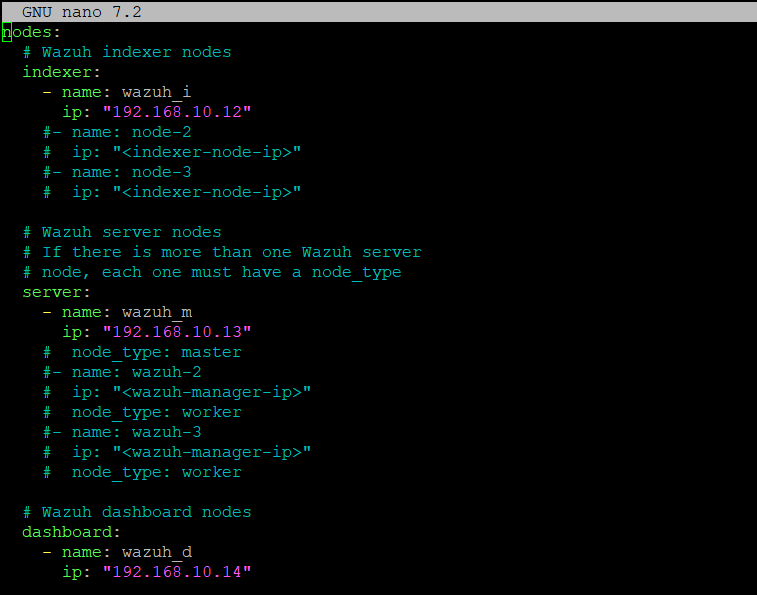
This is the most critical step. Open config.yml and replace the default node names and IPs with your actual values. Every node in your cluster must be defined here.
nodes:
  # Wazuh indexer nodes
  indexer:
    - name: wazuh_i
      ip: "192.168.10.12"
# Wazuh server nodes
server:
- name: wazuh_m
ip: "192.168.10.13" # Wazuh dashboard nodes
dashboard:
- name: wazuh_d
ip: "192.168.10.14"⚠️ Important: Use internal IPs only. These are used for SSL certificate generation — using public IPs here will cause TLS verification failures.
1.3 — Generate Certificates
Run the certificate tool to generate certs for all nodes at once:
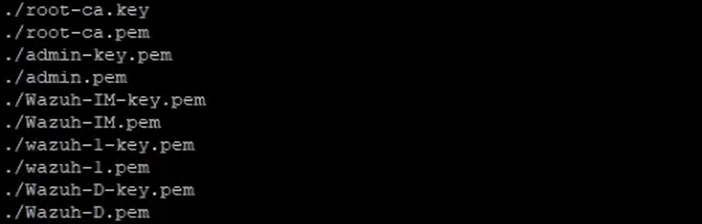
./wazuh-certs-tool.sh -AThis creates certificates for every node defined in config.yml. You'll see files like root-ca.pem, admin.pem, wazuh_i.pem, wazuh_m.pem, wazuh_d.pem, and their corresponding key files.
Now compress them into a tar archive and clean up:
tar -cvf ./wazuh-certificates.tar -C ./wazuh-certificates/ .
rm -rf ./wazuh-certificates
Verify you only have the tar file remaining:
ls
1.4 — Distribute Certificates to All Nodes
Copy the certificate archive to your Manager and Dashboard servers using scp:
# To Wazuh Manager
scp wazuh-certificates.tar ubuntu@192.168.10.13:/home/ubuntu/
# To Wazuh Dashboard
scp wazuh-certificates.tar ubuntu@192.168.10.14:/home/ubuntu/1.5 — Install Package Dependencies
apt-get install debconf adduser procps1.6 — Add the Wazuh Repository
apt-get install gnupg apt-transport-httpscurl -s https://packages.wazuh.com/key/GPG-KEY-WAZUH | \
gpg --no-default-keyring --keyring gnupg-ring:/usr/share/keyrings/wazuh.gpg --import && \
chmod 644 /usr/share/keyrings/wazuh.gpgecho "deb [signed-by=/usr/share/keyrings/wazuh.gpg] https://packages.wazuh.com/4.x/apt/ stable main" | \
tee -a /etc/apt/sources.list.d/wazuh.listapt-get update1.7 — Install the Wazuh Indexer
apt-get -y install wazuh-indexer1.8 — Configure the Indexer
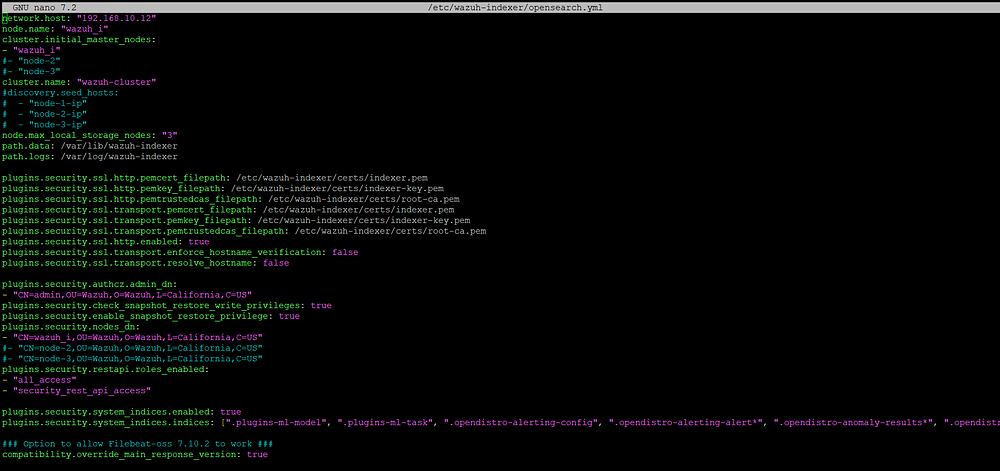
Edit /etc/wazuh-indexer/opensearch.yml and update these key values:
network.host— Set to this node's IP:192.168.10.12node.name— Must match your config.yml:wazuh_iplugins.security.nodes_dn— Update the CN (Common Name) to match your node name:wazuh_i
1.9 — Deploy Certificates
Extract and position the certificates for the indexer:
NODE_NAME=wazuh_imkdir /etc/wazuh-indexer/certs
tar -xf ./wazuh-certificates.tar -C /etc/wazuh-indexer/certs/ \
./$NODE_NAME.pem ./$NODE_NAME-key.pem ./admin.pem ./admin-key.pem ./root-ca.pemmv -n /etc/wazuh-indexer/certs/$NODE_NAME.pem /etc/wazuh-indexer/certs/indexer.pem
mv -n /etc/wazuh-indexer/certs/$NODE_NAME-key.pem /etc/wazuh-indexer/certs/indexer-key.pemchmod 500 /etc/wazuh-indexer/certs
chmod 400 /etc/wazuh-indexer/certs/*
chown -R wazuh-indexer:wazuh-indexer /etc/wazuh-indexer/certs1.10 — Start the Indexer Service
systemctl daemon-reload
systemctl enable wazuh-indexer
systemctl start wazuh-indexer
Verify it’s running:
systemctl status wazuh-indexer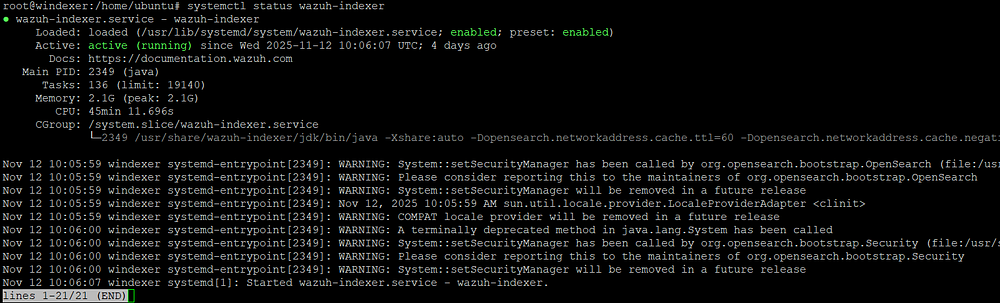
The indexer is live. On to the Manager.
Step 2: Install the Wazuh Manager (Server Node)
SSH into your Manager server (192.168.10.13).
2.1 — Add the Wazuh Repository
apt-get install gnupg apt-transport-httpscurl -s https://packages.wazuh.com/key/GPG-KEY-WAZUH | \
gpg --no-default-keyring --keyring gnupg-ring:/usr/share/keyrings/wazuh.gpg --import && \
chmod 644 /usr/share/keyrings/wazuh.gpgecho "deb [signed-by=/usr/share/keyrings/wazuh.gpg] https://packages.wazuh.com/4.x/apt/ stable main" | \
tee -a /etc/apt/sources.list.d/wazuh.listapt-get update2.2 — Install the Wazuh Manager
apt-get -y install wazuh-manager2.3 — Install and Configure Filebeat
Filebeat is what connects the Manager to the Indexer — it ships the alerts data.
apt-get -y install filebeatDownload the preconfigured Filebeat config:
curl -so /etc/filebeat/filebeat.yml \
  https://packages.wazuh.com/4.14/tpl/wazuh/filebeat/filebeat.yml
Edit /etc/filebeat/filebeat.yml and set the hosts field to point to your Indexer IP:
output.elasticsearch:
  hosts: ["192.168.10.12:9200"]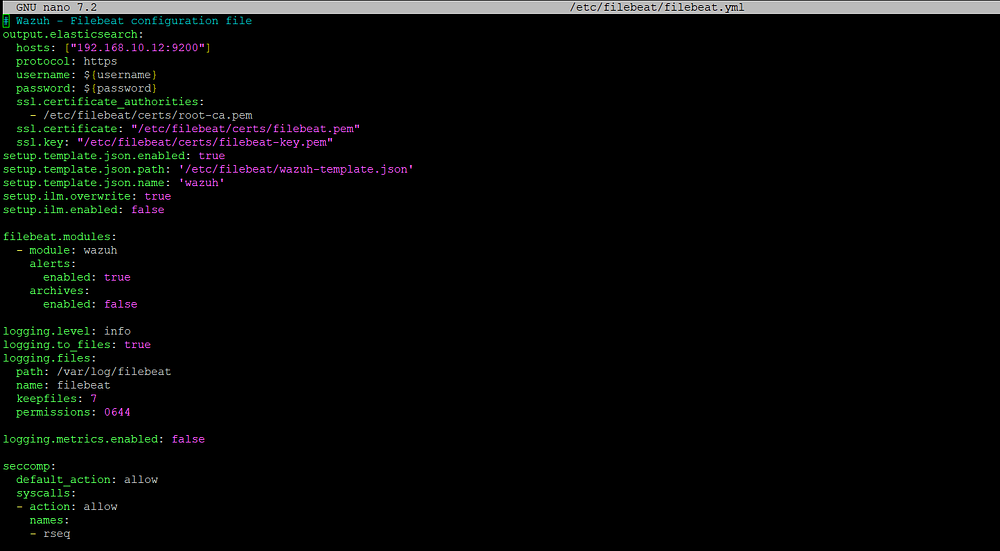
Create the Filebeat keystore and add credentials:
filebeat keystore create
echo admin | filebeat keystore add username --stdin --force
echo admin | filebeat keystore add password --stdin --force
Download the Wazuh alerts template and module:
curl -so /etc/filebeat/wazuh-template.json \
  https://raw.githubusercontent.com/wazuh/wazuh/v4.14.1/extensions/elasticsearch/7.x/wazuh-template.json
chmod go+r /etc/filebeat/wazuh-template.json
curl -s https://packages.wazuh.com/4.x/filebeat/wazuh-filebeat-0.4.tar.gz | \
tar -xvz -C /usr/share/filebeat/module2.4 — Deploy Certificates
Make sure wazuh-certificates.tar is present on this server, then extract the Manager's certs:
NODE_NAME=wazuh_mmkdir /etc/filebeat/certs
tar -xf ./wazuh-certificates.tar -C /etc/filebeat/certs/ \
./$NODE_NAME.pem ./$NODE_NAME-key.pem ./root-ca.pemmv -n /etc/filebeat/certs/$NODE_NAME.pem /etc/filebeat/certs/filebeat.pem
mv -n /etc/filebeat/certs/$NODE_NAME-key.pem /etc/filebeat/certs/filebeat-key.pemchmod 500 /etc/filebeat/certs
chmod 400 /etc/filebeat/certs/*
chown -R root:root /etc/filebeat/certs2.5 — Start the Wazuh Manager
systemctl daemon-reload
systemctl enable wazuh-manager
systemctl start wazuh-manager
systemctl status wazuh-manager
2.6 — Start the Filebeat Service
systemctl daemon-reload
systemctl enable filebeat
systemctl start filebeat
systemctl status filebeat
Two down, one to go.
Step 3: Install the Wazuh Dashboard
SSH into your Dashboard server (192.168.10.14).
3.1 — Install Package Dependencies
apt-get install debhelper tar curl libcap2-bin3.2 — Add the Wazuh Repository
apt-get install gnupg apt-transport-httpscurl -s https://packages.wazuh.com/key/GPG-KEY-WAZUH | \
gpg --no-default-keyring --keyring gnupg-ring:/usr/share/keyrings/wazuh.gpg --import && \
chmod 644 /usr/share/keyrings/wazuh.gpgecho "deb [signed-by=/usr/share/keyrings/wazuh.gpg] https://packages.wazuh.com/4.x/apt/ stable main" | \
tee -a /etc/apt/sources.list.d/wazuh.listapt-get update3.3 — Install the Wazuh Dashboard
apt-get -y install wazuh-dashboard3.4 — Configure the Dashboard
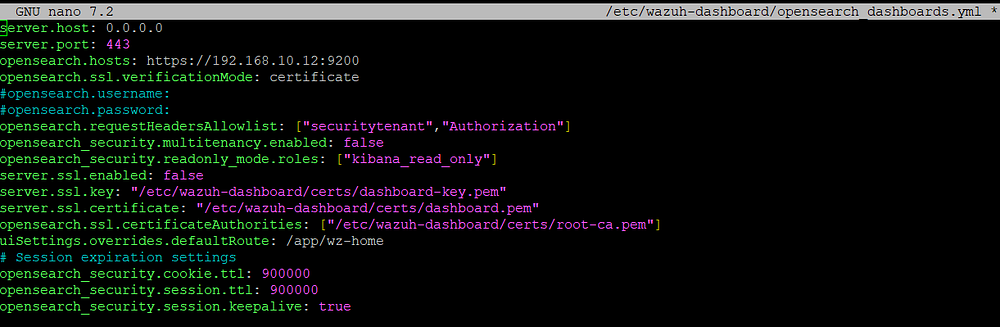
Edit /etc/wazuh-dashboard/opensearch_dashboards.yml and update:
server.host— Set to0.0.0.0to allow remote access (or use the specific IP)opensearch.hosts— Point to the Indexer:https://192.168.10.12:9200
3.5 — Deploy Certificates
NODE_NAME=wazuh_dmkdir /etc/wazuh-dashboard/certs
tar -xf ./wazuh-certificates.tar -C /etc/wazuh-dashboard/certs/ \
./$NODE_NAME.pem ./$NODE_NAME-key.pem ./root-ca.pemmv -n /etc/wazuh-dashboard/certs/$NODE_NAME.pem /etc/wazuh-dashboard/certs/dashboard.pem
mv -n /etc/wazuh-dashboard/certs/$NODE_NAME-key.pem /etc/wazuh-dashboard/certs/dashboard-key.pemchmod 500 /etc/wazuh-dashboard/certs
chmod 400 /etc/wazuh-dashboard/certs/*
chown -R wazuh-dashboard:wazuh-dashboard /etc/wazuh-dashboard/certs3.6 — Start the Dashboard Service
systemctl daemon-reload
systemctl enable wazuh-dashboard
systemctl start wazuh-dashboard
Now connect the Dashboard to the Manager. Edit /usr/share/wazuh-dashboard/data/wazuh/config/wazuh.yml:
hosts:
  - default:
      url: https://192.168.10.13
      port: 55000
      username: wazuh-wui
      password: wazuh_wui
      run_as: false
Verify the dashboard is running:
systemctl status wazuh-dashboard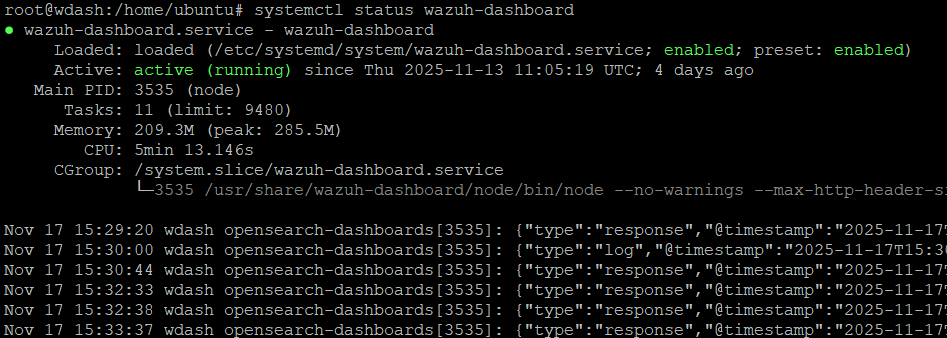
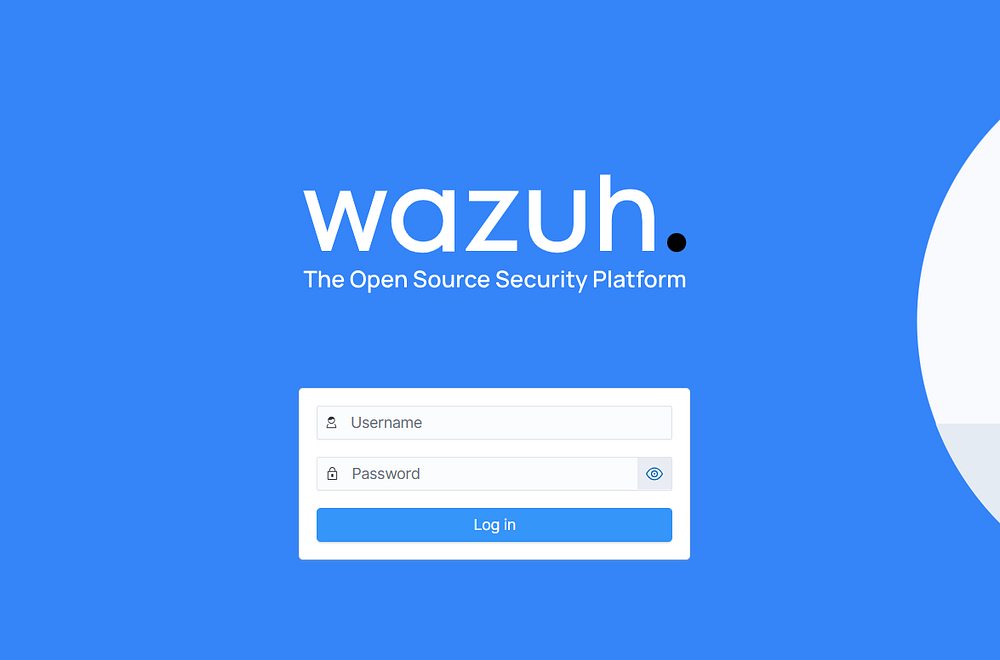
Access the Wazuh Dashboard
Open your browser and navigate to:
https://192.168.10.14Log in with your admin credentials (admin / admin by default — change this immediately in production).
Wrapping Up
You now have a fully functional Wazuh multi-node deployment with:
Dedicated Indexer handling log storage and search queries
Dedicated Manager processing alerts from all your agents
Dedicated Dashboard serving the web UI independently
This architecture scales well. When you need more storage, expand the Indexer. When alert processing becomes a bottleneck, you can add worker Manager nodes. And the Dashboard can be load-balanced behind a reverse proxy for team access.
What’s Next?
Change default passwords — Run the Wazuh password tool to secure your cluster
Deploy agents — Start enrolling endpoints across your infrastructure
Configure active response — Set up automated blocking and remediation
Set up log rotation — Manage indexer storage with ISM policies
Integrate with your SOC tools — Connect to TheHive, MISP, or your SOAR platform
Support My Work
I build open-source security tools, SOC automation workflows, and hands-on guides like this one. If you want to take your security operations to the next level, check out my ready-to-deploy products